Sunday, January 3, 2021

SYW Global Campaign - 1757, Prussia vs Britain

 Prussia attacks Hanover


PR Frederick 420 pts VS BR Cumberland 260 pts

As the mist clears on a morning of early spring (too early if you would ask the British) in Hanover, the battle lines become clear. 

Having been sent by George II to defend his honor and sacred homeland, the Duke of Cumberland was surprised by the speed and size of the Prussian host, and was unable to even consider effectively withdrawing to the sea by the time the 2:1 superiority of the Prussians became clear. With little else in terms of options, the army of Hanover took up defensive positions around Hastenbeck, the best strong point they could think of, and blindly awaited the storm.

Frederick II, meanwhile, knew that victory was not enough. Total surrender and with minimal casualties would allow him to carry on untroubled to dealing with his true enemies to the south. By taking the British escape rout as they clung desperately to the fortifications around Hastenbeck, he suspected they would give up the fight rather than face their "fellow Germans"


With the stakes high for both sides, the battle begins...

The Prussians, knowing the British's strength, are reluctant to engage them from the front, especially at their fortified positions. Instead, they try to send their forces all around their left to cut off the British retreat path.

At the start of the battle, the elite Prussian cavalry and the elite Hanover infantry on the far right failed their discipline checks and charged each other in the first round.

The Prussian elite cavalry skirmishes with the Hanover elite but ultimately falls back.

In Round 3, the Hanover elite again fails discipline and keeps charging down the hill, with light cavalry in support. Seeing the weight of the British reserves committed, the Prussians send reserve fusiliers to trip through the forest and flank the British attack.

Meanwhile the Prussians start pressuring the other side of the British ring to break through, but little progress is made early on. 

By Turn 2, the Prussians are cutting around the left to get at the British flank. Hessian dragoons are sent to harass them but are driven off by the superior Prussian cuirassier.

At the bottom of Turn 2 Round 1, the Prussians mob the flanked Hanover elite corps and destroy 1 brigade.

Seeing the flank problem in Round 2, the Hanover elite starts to sidle to reposition towards the friendly rear town and escape route, while being harried by Prussian cavalry.

Meanwhile, lucky shooting clears the supposedly fortified town of Hastenback from the elite hessian grenadiers guarding it, resulting in a swift capture of the town, well before what was expected.

Similarly, the outmatched Hanover line corps guarding the stream is outgunned and begins to disintegrate by end of Turn 2.

At the beginning of Turn 2 Round 3, holes are developing all around the British defensive ring... with Hastenbeck taken by surprise, the British attempt to withdraw across the field in good order while the forward units sacrifice themselves for time.

On the right the Hanover dragoons spend a couple rounds preventing the Prussian flanking force from advancing but are forced to retreat after heavy losses.

By Turn 3 the Hanover infantry guarding the stream completely disintegrate, leaving the left half of the Prussian army to sweep across the center.

On the right, the Hanover guard continues to withdraw in good order, flanked on both sides by solid Hanover cavalry, and supporting fire from the heavy batteries. A small hessian regular corps guard the the retreat point, facing down the rushing Prussian units on the left.

Seeing that this will come down to guarding the retreat point, the British send the last Hanover line brigade to block the advancing Prussians to the south while the elite brigades continue to retreat.

The Hanoverian heavy cavalry succeeds in driving back the numerically superior Prussian hussars, AND a corps of garrison troops while the Hanover elite line up to defend the retreat point.

By Round 2 the British successfully forms a solid box around the retreat point, and it looks challenging to take.

They also hit their break point so they know this may be the last turn. if they hold the retreat point they will get a chance to escape and run for the ships.

Meanwhile the Hessian elite are mobbed on all sides by rearguard Prussians, and destroyed.

At the bottom of the turn the Hanover batteries are charged down by flanking Prussian cavalry, but the infantry behind them are well set up to block them after.

Forming a final ring the British seem to have a strong position, fresh troops, and only 1 more round until getting a chance to retreat.

However in Turn 3 Round 4, the Prussians lay down withering fire on the fortified retreat point town, and the Hessians once again fail most of their saves, taking 4 damage. Seeing the successful shooting, the Prussians charge from all directions, destroying 2/3 completely fresh Hessian brigades and take the town without effort.

Meanwhile the elite Hanover brigades, having successfully gotten back to the retreat point, fail their discipline for a 3rd time, charging out of the ring directly into the Prussian elite cavalry.

Charged on all sides by cavalry, the Hanover elite roll a 6 in both combats, which, when combined with beaten up Prussian units, wins both combats and send the right side Prussians running in 3 directions, with only minor Hanover casualties to show for it.

Despite this last victory, the retreat point is overrun and the British are in no position to retake it.

At the end of Round 4, the turn ends, and the British have no choice but to surrender completely. This ends the game on Turn 3, with a complete victory for the Prussians with no broken units.


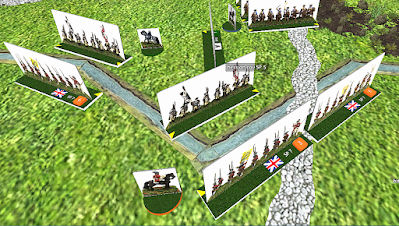
Seven Years War Global Campaign - Pre-game Deployment


Europe


Colonial


Wednesday, August 28, 2019

Full Lasalle Game Austrians vs French

Had a quick lasalle game today between Austrians and French. Avant Garde with Infantry and Cuirassier vs French Line Division with Elites and Dragoons.

50% Old Glory models, 40% Tundraworks, 10% Battle Honors.


Reserve Cavalry for both sides arrived early, the dragoons on the flank and the Cuirassier in the center.  French Elites counter-charged to make a hole in the Austrian right but were unable to make a difference before austrian infantry and cuirassier broke through the center.

Tuesday, August 27, 2019

Review for TundraWorks 15mm Austrian Line


Full disclosure: I’m writing this review of the painting process of the Tundra Works Austrian line as an insider at Tundra Works. I work on production of the molds and models, but only offer some opinions relating to the design aspect. As such I thought I would write up my initial experience with these models as they are relatively "new to me."


First off, painting these things was bloody easy. I can’t overstate that. They were designed to be that way but it’s great to see it come together. Being a true 15mm scale we did very little in the department of oversizing accessories and other features; meaning that you spend a lot less time detailing than you would on other lines of models. The other reason these paint so quickly is that they are more or less 2d models. Some lines are posed with musketmen mid-stride and muskets held at present arms. This creates 3/4 distinct “sides” to the model that all require attention. On the Tundra Works Austrians the poses are very simple, rifles down and men standing at ease or at attention depending on the pose. You paint the front, then the back and that’s it. 

For the process I followed this 
(link) 
guide for the most part. I did a pure white base coat with a spray can to start. I did the 
muskets, hair and backpacks with Vallejo Beige Brown. After that I painted the skin 
tones with VallejoFlat Flesh. The boots, ammo pouch and shako were painted using a 
mix of 1 part Formula P3 ironhull grey and 4 parts Army Painter matt black. 
I then did the bayonets and bedroll with Vallejo Dark Ghost Grey. I specifically 
chose not the detail the metal parts on the musket other than the bayonet. This is 
because with the more or less true scale of the accessories you simply 
won’t see these at table height. You could definitely still paint them but I 
am very much not a stickler for details. 

Anyway, with the base colours done I hit all the models with a light to medium coating 
of Vallejo Umber wash. I tried my best to not over do it since it can easily make it 
look like your men slept in a pigsty. I wanted a brown tone, not a mud bath. After 
that I hit the white highlights, strapping on the front, white buckles on the kit on 
their backs and a bit of white on the back of the collar using Formula P3 Morrow 
white. I did the back of the collar since the wash had a tendency to pool there 
and adding a touch of white seemed to make the models pop a bit more at a 
distance. After that I did the coloured turnbacks and cuffs as per this guide 
 https://www.baccus6mm.com/_paintingguides/NAP_Austria.pdf 
This is really useful as well for seeing the different regimental 
colouring (mine are Schroeder’s regiment). For that I used Vallejo Blue. I very 
intentionally overstated the size of the turnbacks simply because it was 
easier than painting the very small truescale details. It also makes the
 pop way more at table height.  After that it was just a matter of getting 
the green and yellow highlights on the shako. I used Army Painter Daemonic 
yellow and Flames of War camo bright green.

A few extra steps were there for the officers but it was mostly just for the drums 
and swords. For the drums I did a brown outside and a beige ochre for the skin. 
After washing I highlighted the strings on the drum with white. For the swords 
I just did with a Gold handle and grey scabbard, although I’m not actually sure 
if that is the right colour for swords in the Austrian army, so check that one 
out yourselves. It looks good to me though.

There are a lot of details I intentionally left out. They are quite small on the true scale model and definitely do not need to be done for gaming at this scale. Although they are still there and if you are a perfectionist you can get them. I also decided to base these guys at 10 per base. Since these are smaller than heroic 15s/18s you have a lot more room to work with, and a big unit of Austrians with 60 men is just so much more imposing. I think they came out great for gaming quality and at 10-12 minutes per model for the painting (not including basing, although that wasn’t hard either) they are very suitable for large armies with lots of models to be painted.


Overall painting these was remarkably easy and fun. I haven’t enjoyed myself this much ever while painting historicals. The only thing I like painting better are my custom urban rubble based sci fi space Soviets.

Product Page Link:
https://www.facebook.com/TundraWorks

Thursday, August 15, 2019

Gaming Lasalle with a full division of Tundraworks French


Gave my 4 battalions of French line a spin along with the same amount of one of our early product testers, which turns out to be the base army for a french line division. Supplemented the support stuff from my italian collection.

There are some Tundra Austrians opposing them, but mostly old glory 15s.

Game went well for the Austrians, mostly becoming a matter of attrition which favors them.


I also tested a basic aspern scenario, finding the austrians to be progressing through the town too slowly even with substantial luck.

Tuesday, August 13, 2019

Full Brigade of New Casts Painted and Based

1st regiment, france, 1809ish (and not fond of the new eagle ordnance), 15mm.


These are models I've been working on for about 6 months now, all the feedback during design and testing has been much appreciated. We are not yet selling these publicly but if you'd like to follow our developments more closely just check out
https://www.facebook.com/TundraWorks