Prussia attacks Hanover

PR Frederick 420 pts VS BR Cumberland 260 pts
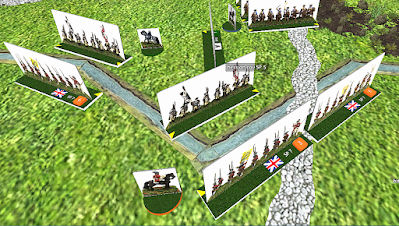
As the mist clears on a morning of early spring (too early if you would ask the British) in Hanover, the battle lines become clear.
Having been sent by George II to defend his honor and sacred homeland, the Duke of Cumberland was surprised by the speed and size of the Prussian host, and was unable to even consider effectively withdrawing to the sea by the time the 2:1 superiority of the Prussians became clear. With little else in terms of options, the army of Hanover took up defensive positions around Hastenbeck, the best strong point they could think of, and blindly awaited the storm.
Frederick II, meanwhile, knew that victory was not enough. Total surrender and with minimal casualties would allow him to carry on untroubled to dealing with his true enemies to the south. By taking the British escape rout as they clung desperately to the fortifications around Hastenbeck, he suspected they would give up the fight rather than face their "fellow Germans"

With the stakes high for both sides, the battle begins...
The Prussians, knowing the British's strength, are reluctant to engage them from the front, especially at their fortified positions. Instead, they try to send their forces all around their left to cut off the British retreat path.
At the start of the battle, the elite Prussian cavalry and the elite Hanover infantry on the far right failed their discipline checks and charged each other in the first round.


The Prussian elite cavalry skirmishes with the Hanover elite but ultimately falls back.

In Round 3, the Hanover elite again fails discipline and keeps charging down the hill, with light cavalry in support. Seeing the weight of the British reserves committed, the Prussians send reserve fusiliers to trip through the forest and flank the British attack.

Meanwhile the Prussians start pressuring the other side of the British ring to break through, but little progress is made early on.
By Turn 2, the Prussians are cutting around the left to get at the British flank. Hessian dragoons are sent to harass them but are driven off by the superior Prussian cuirassier.

At the bottom of Turn 2 Round 1, the Prussians mob the flanked Hanover elite corps and destroy 1 brigade.

Seeing the flank problem in Round 2, the Hanover elite starts to sidle to reposition towards the friendly rear town and escape route, while being harried by Prussian cavalry.

Meanwhile, lucky shooting clears the supposedly fortified town of Hastenback from the elite hessian grenadiers guarding it, resulting in a swift capture of the town, well before what was expected.


Similarly, the outmatched Hanover line corps guarding the stream is outgunned and begins to disintegrate by end of Turn 2.


At the beginning of Turn 2 Round 3, holes are developing all around the British defensive ring... with Hastenbeck taken by surprise, the British attempt to withdraw across the field in good order while the forward units sacrifice themselves for time.


On the right the Hanover dragoons spend a couple rounds preventing the Prussian flanking force from advancing but are forced to retreat after heavy losses.

By Turn 3 the Hanover infantry guarding the stream completely disintegrate, leaving the left half of the Prussian army to sweep across the center.


On the right, the Hanover guard continues to withdraw in good order, flanked on both sides by solid Hanover cavalry, and supporting fire from the heavy batteries. A small hessian regular corps guard the the retreat point, facing down the rushing Prussian units on the left.


Seeing that this will come down to guarding the retreat point, the British send the last Hanover line brigade to block the advancing Prussians to the south while the elite brigades continue to retreat.

The Hanoverian heavy cavalry succeeds in driving back the numerically superior Prussian hussars, AND a corps of garrison troops while the Hanover elite line up to defend the retreat point.


They also hit their break point so they know this may be the last turn. if they hold the retreat point they will get a chance to escape and run for the ships.


At the bottom of the turn the Hanover batteries are charged down by flanking Prussian cavalry, but the infantry behind them are well set up to block them after.


Forming a final ring the British seem to have a strong position, fresh troops, and only 1 more round until getting a chance to retreat.
However in Turn 3 Round 4, the Prussians lay down withering fire on the fortified retreat point town, and the Hessians once again fail most of their saves, taking 4 damage. Seeing the successful shooting, the Prussians charge from all directions, destroying 2/3 completely fresh Hessian brigades and take the town without effort.
Meanwhile the elite Hanover brigades, having successfully gotten back to the retreat point, fail their discipline for a 3rd time, charging out of the ring directly into the Prussian elite cavalry.


Charged on all sides by cavalry, the Hanover elite roll a 6 in both combats, which, when combined with beaten up Prussian units, wins both combats and send the right side Prussians running in 3 directions, with only minor Hanover casualties to show for it.

Despite this last victory, the retreat point is overrun and the British are in no position to retake it.
At the end of Round 4, the turn ends, and the British have no choice but to surrender completely. This ends the game on Turn 3, with a complete victory for the Prussians with no broken units.


Nice Batrep. Good to see M&R getting played.
ReplyDeleteHow long did this game take to play on TTS?
Cheers
HW